Adobe Premiere Pro CC, is one of the most common professional video production suites for Mac and Windows users. Comparing with its predecessor elements and Premiere, it adds native support for MXF files from Sony, Panasonic and Canon, and also includes XAVC files from Sony F55 series. This new features immensely enhanced user operational feasibility so that we can import MXF video from camera to Premiere Pro CC without log and transfer.
But still there are lots of videos that cannot be imported for that it’s not the appreciated formats by Premiere Pro CC, for example, MXF files from Canon XF series/Panasonic P2/Sony XDCAM, XAVC from Sony, etc. So here comes the problem:
How to import MXF videos into Premiere Pro CC without rendering?
Follow this step-by-step guide to quick import MXF to Premiere Pro CC.
Step 1. Launch Premiere Pro CC; connect your camera to Mac.
Here we test with Premiere Pro CC 2014.0. Use a USB cable to connect your camera to Mac and keep it on.
Step 2. Import videos from camera to Premiere Pro CC
Click File>Import>Media, it will pop up an import window;
Find your camera on top left, hit Command and click the clips you want to import.
Step 3. Create new event for this importing or add them to existing event.
After checking all the clips you want to import, hit return and free choose to create new event for Premiere Pro CC or add to existing event. It offers several options to let you optimize video as Premiere Pro CC prefers, enable Remove silent channels and so on. Check them as your own needs, and then hit return.
Step 4. Edit clips in Timeline.
After last hit you will find the clips are showed on the left “All Clips” area. Sliding your cursor to trim out a small part in these clips and hit Shift-Y to add them in timeline; or you can right click it and choose “Open in Timeline”.
Ok now you successfully import videos from camera to Premiere Pro CC, new skills get!
Trouble Shooting:
Well, all the work flow is based on the assumption that your camera/camcorder is recognized by Premiere Pro CC. What if it doesn’t go through as above?
As MXF format is relatively new, many video players or video editors are lacking of native support to it, or are only just starting to add support for this file type. Therefore, MXF camcorder/camera users often meet problems one or another while playing or editing .mxf files. To relieve people’s pains, this article will give a solution to importing MXF file to Premiere Pro CC. If you have demand for this information, please go along with it.
Factually, Premiere Pro mentions that it is working with MXF from CC version on its official site, but some users still encounter troubles while inputting 4K/Full HD MXF files to this editor. Ok, now let’s breakthrough these setbacks one by one together.
If your camera or device isn’t recognized unsupported MXF formats?
If you’ve connected your camera/camcorder to your computer but the MXF Media Import window doesn’t open, or Premiere Pro CC Can’t control your camera/camcorder, here are some steps that you are suggested to try:
1. Your camcorder or camera should be compatible with Premiere Pro CC. Follow this page to track Premiere Pro CC supported video cameras.
2. You should ensure the camera/camcorder on and well connected to computer.
3. If you are importing from flash memory devices or from Mac HDD directly, please ensure the files format is MPEG-2 MPG, H.264/MP4/MOV or WMV which are compatible with Premiere Pro CC.
Hereby if we want to edit video from a camera that Premiere Pro CC doesn’t recognize, at least we need to transcode the MXF videos to formats that Premiere Pro CC likes, so that we can still import them into Premiere Pro CC use a card reader. How to do the conversion? Is that reliable?
What’s New in Premiere Pro CC 22.3?
- Camera to Cloud
- Redesigned import
- New Header bar
- Auto Color, powered by Adobe Sensei
- Remix progress indicator
Best MXF Converter for Premiere Pro CC
There are many video converter applications for you to convert video to be compatible with Premiere Pro CC. Here I humbly recommend Acrok Video Converter Ultimate which comes with intuitive user interface. No prior experience required.
To these people, the only way to let Premiere Pro CC work with all MXF files is convert these files to Premiere Pro CC compatible formats like WMV, MPG, MOV and MP4 previously. The converter I personally used is Acrok Video Converter Ultimate, I usually use it to convert my MXF files for my Roku TV, and its output formats is various, including optimized presets for Premiere Pro CC. You can select a preset format for your Premiere Pro. To be honest, I’ve tried many other converters before choosing it, this one can make my audio and video go in the same way, so it finally won my appreciation. Hopefully it will also do you a favor.
Free download MXF to Premiere Pro CC Converter


How to convert MXF to Premiere Pro CC supported video format?
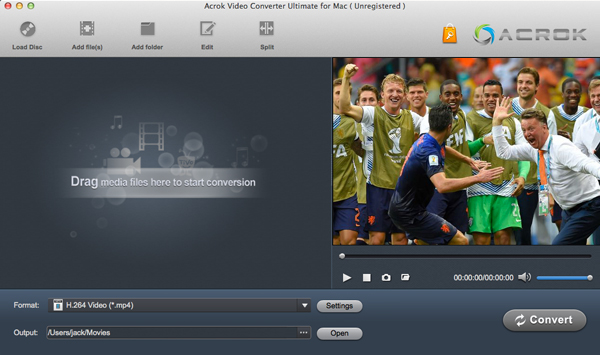
Step 1. Add Your MXF Files
Download and install this MXF to Premiere Pro video converter and open it after installation. The primary screen is as simple as the image shown below. To import MXF to Premiere Pro video converter, click the Add file icon. Then choose your MXF files from the browser. Alternatively, drag and drop MXF files to the application.
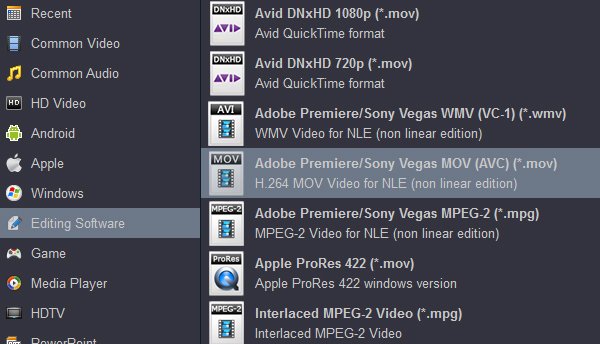
Step 2. Choose The Output Format
This MXF to Premiere Pro CC Converter makes it extremely easy to make any video compatible with Premiere Pro CC. It directly comes with an output option for Premiere Pro CC. Just go to the Format tab and select Adobe Premiee AVC MOV under “Editing Software” category. No other settings needed, saving you big time.
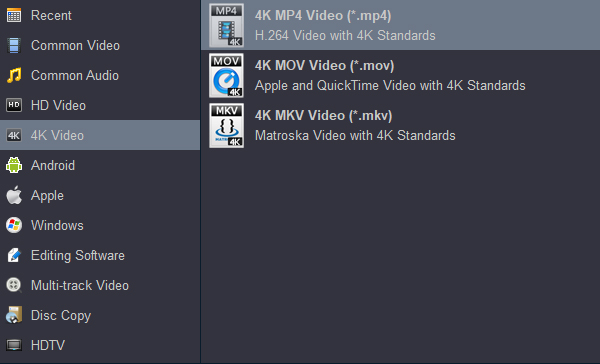
Tip: If you want to get 4K output options, please choose 4K MP4 as output format directly.
Step 3. Converting MXF to Premiere Pro CC Compatible Format
Also specify the output folder if necessary. Finally, click the Convert button and in seconds, your video files will be totally compatible with Premiere Pro CC.
Step 4. Import MXF to Premiere Pro CC for editing
After the conversion is complete, go to the output folder by clicking “Open” button and select files and drop to an event in the Libraries list in Premiere Pro CC. See detailed steps on adobe.com if you want help. With this amazing software, you’re able to edit MXF and almost any video file in Premiere Pro CC. No compatibility problem from now on.

No responses yet