“How can I import Sony AX100 recorded MTS files to Premiere for editing? I just got this camcorder and recorded some 1080 60p videos, these videos are in AVCHD MTS format, now I need to edit Sony AX100 files with Adobe Premiere Pro CC, the format seems can’t be supported, can you help me?”
Sony AX100 is a 4K Camcorder with 1″ sensor, it can capture 4K/30p video that far exceeds HD resolution. It equipped with 1″ Exmor R CMOS sensor with direct pixel readout, Carl Zeiss Vario-Sonnar T lens with 12x optical zoom. It can record videos in XAVC-S, AVCHD and MP4 formats. Most of the users will prefer to choose AVCHD 1080/60p as the output format considering the quality of the videos. But when they import their Sony AX100 videos to Adobe Premiere CC/CS6/CS5, the problem of incompatibility between their 1080/60p MTS and Adobe Premiere arises. Then how can we import Sony AX100 1080/60p MTS to Adobe Premiere CC/CS6/CS5?
The best way is to convert Sony AX100 files to Premiere supported best video format, such as MOV. Now we got an key to the problem and recommend the best Sony AX100 to Adobe Premiere CC/CS6/CS5 Converter to all the Sony AX100 users. Applying it, you can not only do the conversion successfully, but also merge several videos into one file, deinterlace the original footages, crop video size, trim video clips, and add special effects and text/image/video watermarks to output videos, thus it will be on the top of your list.


Here is the step-by-step guide on how to transcode Sony AX100 AVCHD to MOV and then edit the converted files in Adobe Premiere CC/CS6/CS5.
Step 1: Import Sony AX100 AVCHD files to the top Sony AX100 to Adobe Premiere CC/CS6/CS5 Converter.
Connect your Sony AX100 to your Mac or Windows computer. Launch Sony AX100 AVCHD to Adobe Premiere CC/CS6/CS5 Converter. You can tick the box in front of the file you want to convert. If it is necessary, you can double click the each file to have a preview.
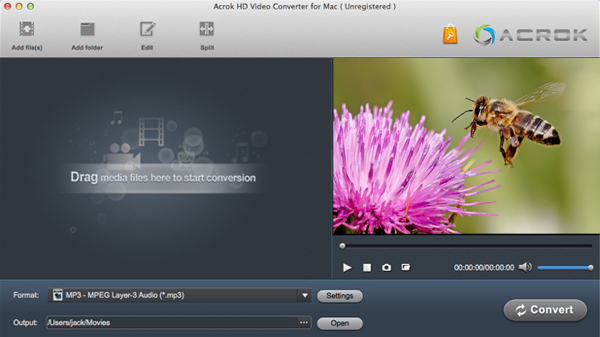
Tip: If you have multiple Sony AX100 files, you can tick the “Merge into one” box to combine the multiple video files into one single file so that you can play these files without interruption.
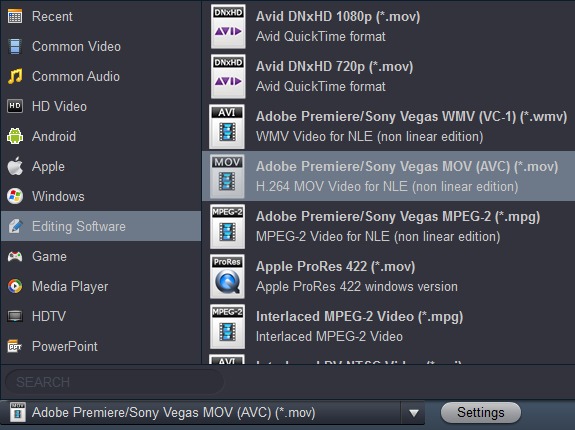
Step 2: Select the output format which is specialize for Adobe Premiere CC/CS6/CS5 and set the output folder.
Click the format box and you will get a drop-down list in which the last but one is what you need: Adobe Premiere/Sony Vegas> MOV. Then you can set the output folder by clicking “Browse” icon as you prefer.
Step 3: Click “Settings” to adjust audio and video parameters.
Click the “Settings” icon and you will get a new interface named “Profile Settings”. You can change the default codec, bit rate, frame rate, sample rate and audio channel according to your needs and optimize the output file quality. With these settings, you can get high quality videos, and keep stereo channels to keep the best quality for editing in Adobe Premiere.
Step 4: Start converting your Sony AX100 AVCHD 1080/60p to MOV for Adobe Premiere CC/CS6/CS5
Click the “Convert” button; it will convert/transcode Sony AX100 AVCHD 1080/60p MTS to Adobe Premiere CC/CS6/CS5. You can find the process in the “Conversion” interface.
When the conversion process is 100% completed, you can add the output files to Adobe Premiere CC/CS6/CS5 by clicking “Open” effortlessly. Now you can easily import the converted and/or merged Sony AX100 videos to Adobe Premiere CC/CS6/CS5 for editing with high quality without any trouble. Just take a try now!

No responses yet